How to do yoga with bad knees
Ease joint pain by learning how to practise yoga with bad knees

Harry Bullmore
Start your week with achievable workout ideas, health tips and wellbeing advice in your inbox.
You are now subscribed
Your newsletter sign-up was successful
If aching joints have a habit of putting the kibosh on your workout plans, learning to practise yoga with bad knees can be a fantastic way to stay active. Not only will it allow you to exercise without aggravating any existing injuries, but it can also help alleviate pain while building a strong and supple body.
To demonstrate this point, one study published in the National Library of Medicine found that 30 women with knee osteoporosis experienced significantly less pain and an increased quality of life after eight weeks of Hatha Yoga (a term used to describe any yoga practice involving a sequence of physical poses and breathing techniques).
Nevertheless, before you dive into downward facing dog, it’s imperative to find the best yoga mat for the type of practice you plan to do. A grippy mat will allow you to plant your limbs with confidence, even during sweatier hot yoga sessions, while a cushioned surface will protect your knees, spine and elbows during dynamic Vinyasa flows.
You should also take the time to learn which poses feel good for you, avoiding any that might put undue stress on bad knees.
Yoga sequence for bad knees
LucyMcCarthy, yoga teacher for the online yoga platform Movement For Modern Life, has created this deeply nourishing knee-friendly yoga routine to provide yogis with longevity in their practice.
“Just because there is a knee issue, it doesn’t mean we should abandon our yoga practice,” says McCarthy. “In fact, yoga has been proven to be incredibly helpful both in preventative and curative issues around the knees. When done mindfully, in alignment, and sometimes with the help of props, we can use our yoga practice to create healthy, strong knees that will cultivate longevity.”
McCarthy explains that in an ideal world we want both the quadriceps and hamstrings to be both strong and flexible to support optimal knee functioning. This sequence is designed to support the knees but also build strong, long, and lean quadriceps and hamstring muscles – all with the aim of creating happier, long-lasting knees.
Start your week with achievable workout ideas, health tips and wellbeing advice in your inbox.
Need some more tips on your practice? Have a look through our guide to anti-aging yoga moves, or try out this wrist-free yoga flow if you suffer with joint pain.
Supported hero’s pose (x 3-5 breaths)
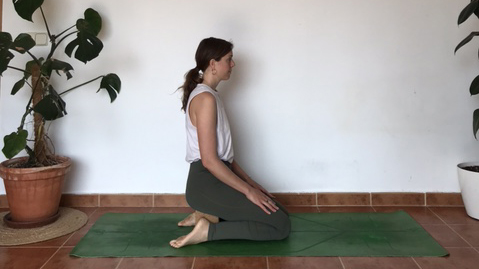
Start kneeling with the top of your shins on the floor, knees together, and feet wider than the outer edges of your hips, then place whatever height prop you need underneath your buttocks and sit down. Ideally the whole top of your foot will be on the floor alongside your outer buttocks. Check that your ankle joint is not sickling – your toes shouldn't curve inwards and your heel should drop back – and ensure that the middle of your heel lines up with the base of your second toe.
Expert tip: In this pose, your knees are under what’s known as the tourniquet effect. Think of a hosepipe folded in half where the flow of water is stopped. When the hosepipe is unfolded, a flash of water flows through again. Essentially this is what is happening in hero's pose with your blood flow. The higher the support between your buttocks and the ground, the more space there will be at the back of the knee, and the more comfortable and spacious it should feel.
All fours heel pulses (x 2-3 per side / x2 breaths per hold)
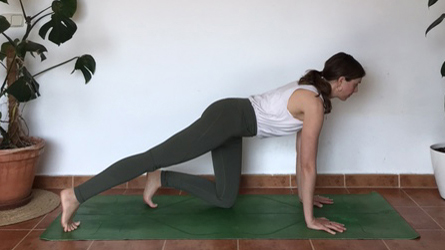
From supported hero’s pose, place your hands in front of you on the floor and slowly elevate your buttocks. Move whatever props you were sat upon out the way, then come onto your hands and knees. Ensure your wrists are directly underneath your shoulders, parallel with the front edge of the mat. Glance back at your knees and check they are directly underneath your hips – thigh bones vertical. If there is any discomfort in your knees, place them on a thin, firm blanket to give you some cushioning.
Spread all 10 fingers, then on an exhale stretch your right leg straight back with your toes tucked under, heel stacked over the ball of your foot. Gently start to pulse the right heel forwards and backwards, pivoting on the ball of your right foot. Continue for a few rounds, then pause with your right heel stretched back for two breaths. Return to all fours and repeat on the left side.
Expert tip: This will help release your knees after hero’s pose, and stretch your lower calf muscles.
Downward facing dog (x 3-5 breaths)
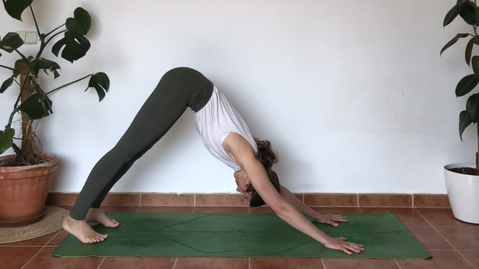
To prepare, walk your hands forwards so they are roughly one hand's distance away from the front edge of your mat, with your arms at a 45° angle. Tuck your toes under and on an exhale, lift your knees and reach your hips diagonally back and up into downward facing dog. Bicycle out your legs by bending into one knee as you press your opposing heel into the ground.
Expert tip: Bicycling the legs in downward facing dog is another way of helping to stretch out and release any tension in the calf muscles.
Uttanasana - Forward fold (x3 breaths)
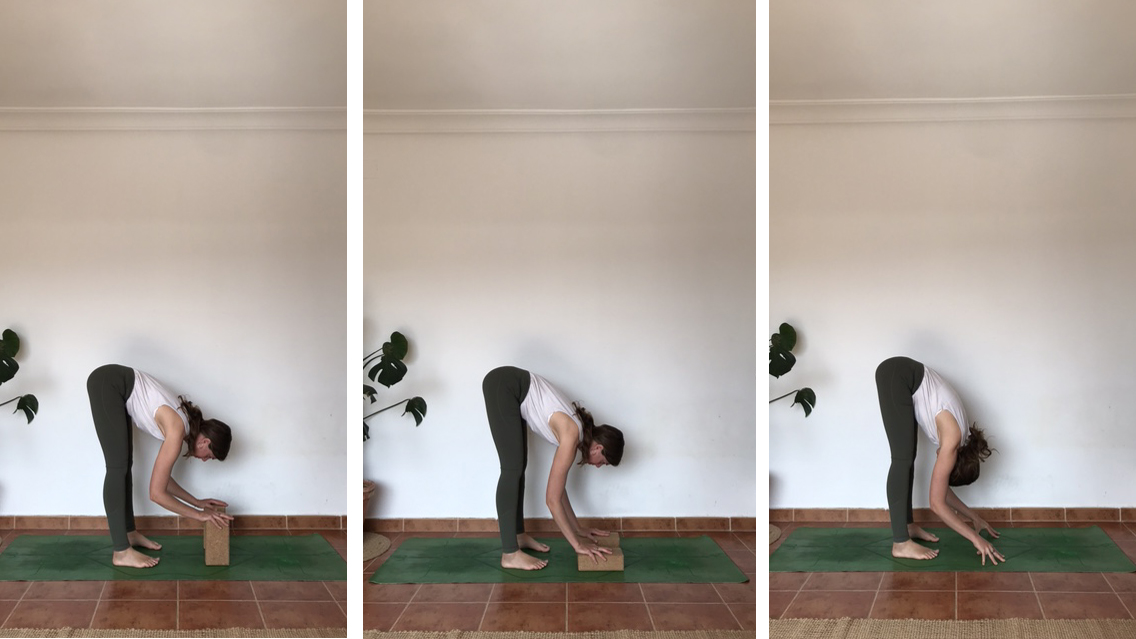
Variations of the forward fold move.
Find stillness in downward facing dog, then slowly start to walk your feet up between your hands, hip-width apart. If it’s difficult to have your hands on the ground without bending your knees, then place your hands on yoga bricks at the highest height. With your hands on the floor (or the bricks), about one foot in front of your toes, gently bend your knees.
Expert tip: Press your hands down and forwards energetically, while simultaneously trying to drag your heels backwards. Though there will be no visible movement, the static engagement of your hamstrings muscles should allow you to feel some strengthening and stretching. Avoid locking your knees out.
Utkatasana - Chair pose (x 3-5 breaths)
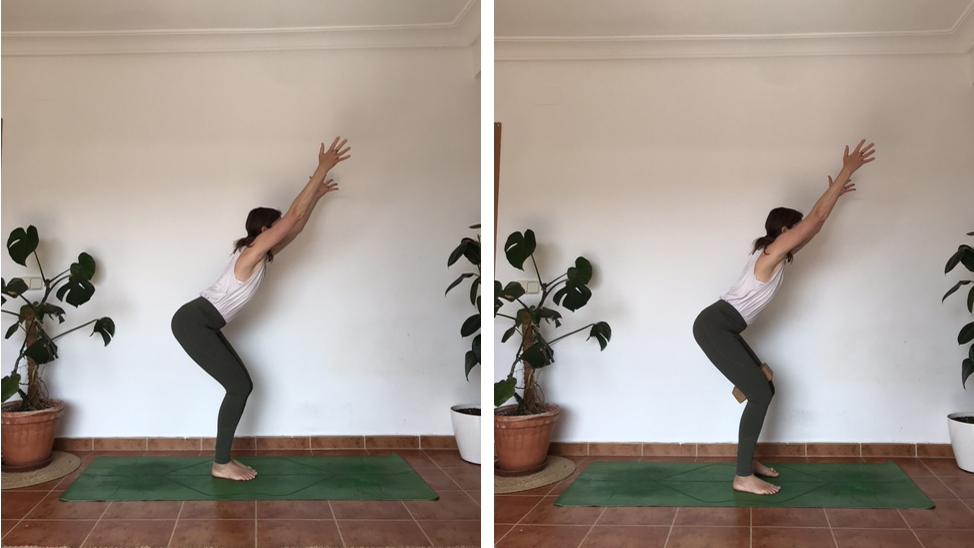
Chair pose variations.
Move your props gently to one side, then step your feet together so your inner ankles and knees touch. Bend your knees so that your fingers reach the floor alongside your outer feet. Keep the depth of the bend in your knees, then lift your torso three quarters of the way upright, with your arms overhead alongside your ears and hands shoulder-width apart.
Expert tip: Keep your inner knees glued together and tracking behind your toes, with your weight in your heels. Adjust feet to hip-width apart with a brick placed between your lower thighs (just above the knees) if you need more support, and squeeze your thighs.
High lunge knee dips (x3 dips per side)
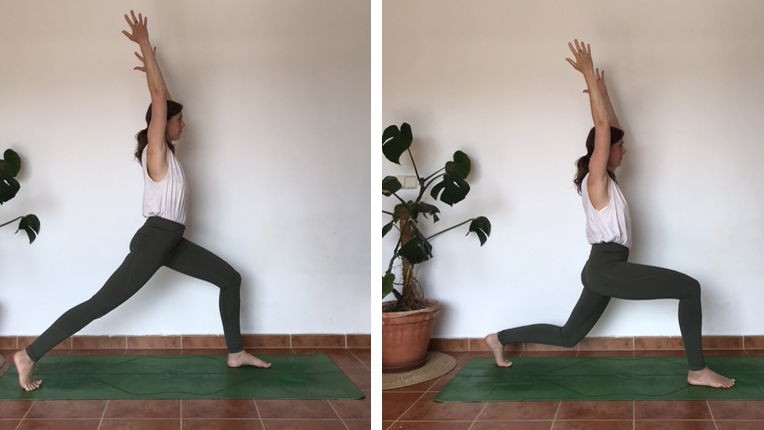
Fold forwards into uttanasana – forward fold. On your inhale, place your palms on your mid shins and press your shins into your hands to avoid overextending the backs of your knees. As you exhale, step back into downward facing dog. On an inhale, lift your right leg back and up into a three legged dog, then rise up onto the ball of your left foot to help step your right foot all the way in between your hands. Ensure that your right knee is stacked vertically on top of your right ankle. Check your feet are hips width apart, then lift your torso upright and stack your shoulders on top of your hips, into a high lunge.
Bring your hands onto your hips. On an inhale, bend your left knee and lower it halfway to the floor, then exhale and press into the ball of your left foot and rise back up into a high lunge. After three dips, step back to downward facing dog and repeat on the other side.
Expert tip: Use core engagement to help lift yourself up. Knee dips are a great way to condition and tone the quadriceps as well as other muscles that support your knee.
Ardha Bhekasana - Half frog (x 3-5 breaths per side)
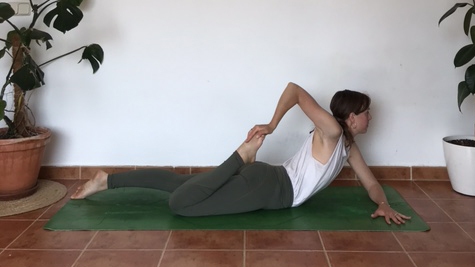
From downward facing dog, inhale, then move forwards into a plank pose, stacking your shoulders vertically on top of your wrists and keeping the heels of your feet directly above the balls of your feet. On an exhale, lower your knees to the floor, then lower the whole front body onto the floor. Prop yourself up on your forearms with your elbows stacked directly underneath your shoulders and palms facing down, forearms parallel with one another, in sphinx pose.
Bring your left forearm parallel to the front edge of the mat. Turn to look over your right shoulder, then bend your right knee and hug your heel in towards your buttocks. With your right hand, grab hold of your foot. Kick your foot backwards, then slowly start to draw your right heel in towards your right buttock, stretching and opening the front of your right thigh. Turn your chest towards the front edge of your mat.
Gently release, return to sphynx, then switch sides.
Expert tip: You can modify by looping a strap around your foot and holding onto the strap instead. This pose is an excellent way to stretch and release the quadriceps and hip flexors which cause knee misalignment when tight.
Bridge (x5 breaths)
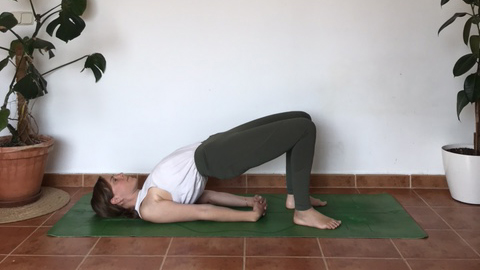
To prepare for bridge pose, simply roll from your belly onto your back.
Bend your knees and place your feet parallel, hip-width apart, with your heels close towards your buttocks. Ideally, your knees are vertically stacked above your ankles. Take a long slow deep breath in, then exhale and lift your hips and whole spine up off the floor. Interlace your hands on the floor underneath your lower back, with your palms facing upwards. To come down, release your hands, then move your arms out to the sides, and slowly lower your spine.
Expert opinion: Use a strap if you struggle to interlace your hands. If there’s any discomfort in your knees, you can slightly walk your feet away from your hips. This is brilliant for your hamstrings and spine.
Supta Virasana - Supported reclining hero’s pose (x 10-20 breaths)
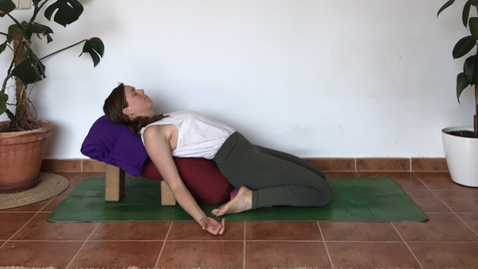
Setup: Place a yoga brick at its highest height at the back of your mat, then prop one end of a bolster (or similar) up on the brick so that the bolster is at a 45° angle. One end of the bolster will be on the floor. Just in front of the lower end of the bolster, place a thin firm cushion or a lightly folded blanket. This will be for your buttocks to sit on.
Start by kneeling in front of the cushion or blanket with your knees together, separating your feet either side of the blanket or cushion. Slowly lower your buttocks onto the blanket or cushion. Add more height underneath your buttocks and spine if you feel discomfort. Place your hands behind you on the floor, then lift your hips and gently lengthen your tailbone towards the backs of your knees. Slowly, lower your spine onto the angled bolster. Release your hands alongside your body, palms facing upwards.
Expert opinion: If your chin is lifted higher than the height of the forehead, add a light cushion behind your head. This can be super nourishing with a good deal of support from props. If the position is still not comfortable when adding height, then move directly into savasana.
Like with hero’s pose, you can benefit from the tourniquet effect in this pose, while adding some stretching of the quadriceps and hip flexors.
Savasana (x3 minutes)
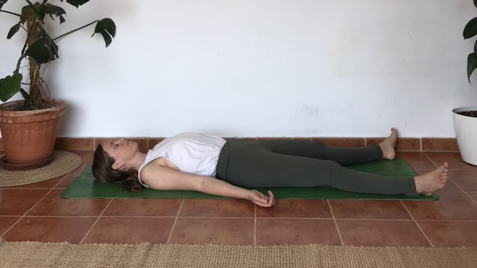
Slowly lift your spine and move onto your hands and knees. Repeat pose two in the sequence for a few breaths just to guide blood flow. Gently come to lie down on your back, with your feet hip-width apart flopping out to the sides, and arms slightly away from your body with your palms facing up.
Completely rest in savasana. Corpse pose.
Principles to remember for happy knees:
Alignment matters
The knee is a hinge joint, and the way that we align in our yoga poses will ensure the safety and longevity of the knees. Whenever the knees are at a 90 degree angle in a yoga pose, ensure that the knee is stacked vertically on top of the ankle and not beyond. Also ensure that the middle of the kneecap lines up with the second toe, as this will help avoid injuring the inner or outer knee.
Regularly strengthen and stretch the quadriceps, hamstrings and calf muscles
This supports the health of the knee and its optimal functioning.
If in doubt
Give your knee joint more space and use props to support your body.
Sam Hopes is a level III fitness trainer, level II reiki practitioner, and resident fitness writer at Future PLC, the publisher of Fit&Well. Having trained to work with both the mind and body, Sam is a big advocate of using mindfulness techniques in sport and aims to bring mental wellbeing to the forefront of fitness. She’s also passionate about the fundamentals of training and how we can build more sustainable training methods. You’ll find her writing about the importance of habit-building, nutrition, sleep, recovery, and workouts.
- Harry BullmoreFitness Writer