
With regular practice, yoga is a great way to improve your flexibility, balance and coordination. That said, some yoga poses can help relieve stiffness right away while still being gentle and accessible.
Melissa Leach, certified yoga instructor at fitness app Yoga-Go has shared four moves that will provide immediate relief for achy joints, and help you develop strength and mobility in the longer term.
“These yoga poses can be useful if you deal with joint stiffness or discomfort because they encourage gentle movement while supporting strength, mobility and alignment,” she says.
“By regularly working the muscles that support your joints, they can help make everyday movement feel more comfortable and controlled,” Leach adds.
Four yoga poses for stiff joints
Each move in this routine offers its own unique benefits.
“Poses like supported warrior one or bridge help strengthen key muscles like the thighs, glutes, or hamstrings, providing greater support for the knees, hips, and lower back, reducing unnecessary strain in those areas,” Leach explains.
“The flowing movements in cat-cow encourage the circulation of synovial fluid, which lubricates and cushions the joints,” she continues.
1. Cat-cow
Time: 30sec
- Begin on your hands and knees with your shoulders over your hands and your hips over your knees.
- Inhale deeply as you arch your back, gently lifting your chin.
- Exhale as you round your spine upward, tucking your chin toward your chest and your pelvis under.
2. Bridge
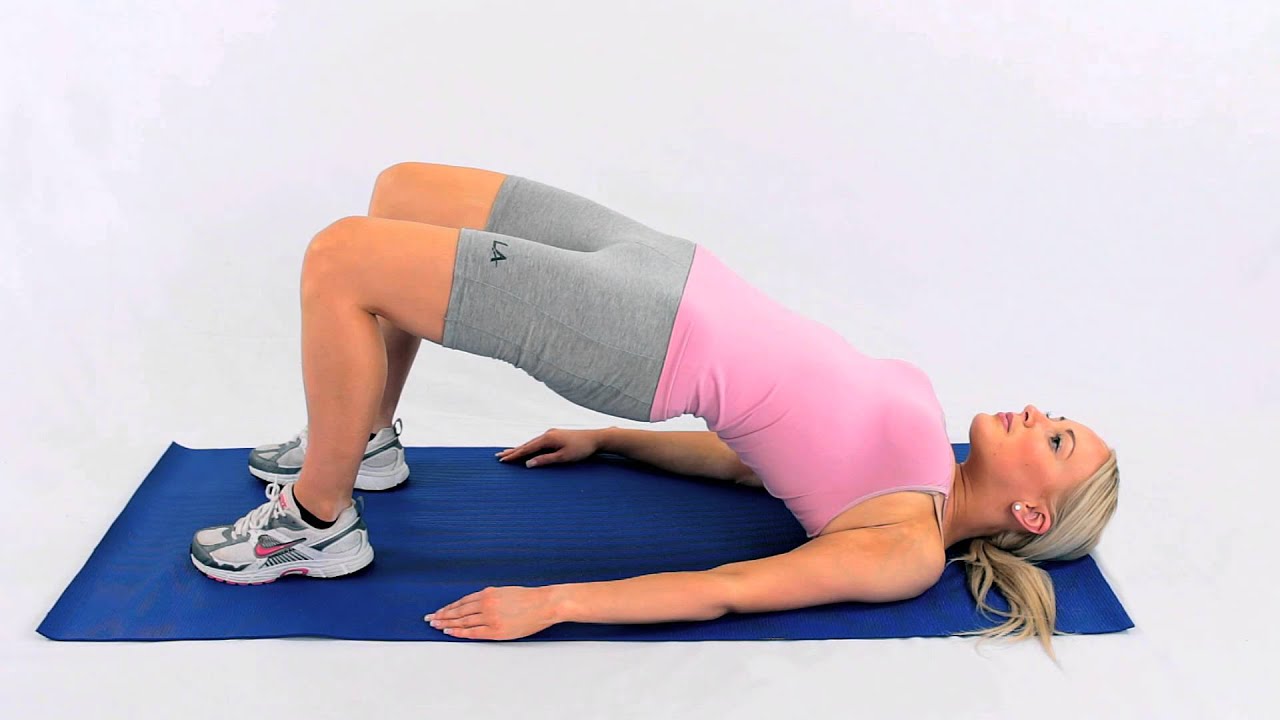
Reps: 5-10
- Lie on your back with your knees bent and your feet flat on the floor, hip-width apart.
- Rest your arms by your sides, palms facing down.
- Press through your feet to raise your hips.
- Keep your knees parallel and your chin tucked.
- Slowly lower to the floor, one vertebrae at a time.
3. Mountain pose
Time: 30-60sec
- Stand with your feet hip-width apart, your arms loosely by your sides. Use a wall or chair for balance if needed.
- Roll your shoulders back and down and tuck your chin slightly.
- Keep your knees soft, your thighs lightly engaged and tuck your pelvis in.
- Look straight ahead or close your eyes.
- Inhale to lengthen through your spine without leaning back or forward.
- Exhale, experience your whole body and breath.
4. Warrior one
Hold: 3-5 breaths each side
- Stand with your feet hip-width apart. Use a wall or chair for balance if needed.
- Step back with your left foot, angling your foot outward slightly and keeping your legs straight and hips facing forward.
- Bend your right knee over your ankle.
- Raise your arms overhead, palms facing inward.
- Hold, pressing your feet into the floor and reaching upwards through your fingertips.
- Reverse the movements back to the start, then repeat on the other side.