This eight-move yoga for mobility routine increases flexibility in just 15 minutes
These yoga for mobility poses are designed to stretch your muscles, protect your joints, and calm your mind
Many people take up yoga for mobility and flexibility improvements, but it's important to find a routine that will move your body in the right way to see the best results.
The only equipment you'll need for this eight-move yoga for mobility session is one of the best yoga mats, so that you feel comfortable during floor-based moves like child's pose and supported in lunges and other yoga stretches.
Although many exercises can aid your mobility, yoga is a more gentle way to move your body which applies a small amount of stress on your joints, muscles, and tissues to build stronger bones, increase mobility, and improve your flexibility.

This'll help you stay active as you age, so it's best to start now to try and prevent any issues in the longer-term. However, you don't need any equipment to do chair yoga for seniors, either, making it an ideal way to ease into the practice.
Eight yoga for mobility poses
These postures will help improve your mobility but take them at your own pace, your body will tell you when you need to stop. Engage your muscles as you practice to get the full benefits.
You shouldn’t experience any pain while doing these yoga postures and if you do, please stop and rest. Not only will you be building strength but you’ll also be loosening the muscles around the joints.
1. Cat-cow

The cat-cow pose is great for freeing the spine and keeping it healthy as we age. It also helps to build strength and flexibility in the wrists.
- Begin on all fours stacking your shoulders over your wrists and knees under your hips. Allow your spine to be in its natural position.
- Spread your fingers and point your toes towards the back of your yoga mat.
- As you inhale, tilt your pelvis dropping your abdomen towards the floor. Lift your chin and look up without straining your neck.
- As you exhale, tilt your pelvis the other way. Press into your hands. Round your back, pressing your shoulder blades towards the ceiling. Bring your chin to your chest.
- Repeat this action 5-10 times, syncing the movement with your breath.
2. Thread the needle

Thread the needle is ideal for releasing the muscles around the shoulders, upper back and neck. It produces a spinal twist helping to keep the spine youthful.
- From an all fours position, walk your right hand forward keeping your elbow straight. Slide your left arm underneath your right arm, turning the left palm up as you do so.
- Rest the left side of your head and face onto the floor, making sure your neck is comfortable. If you experience any discomfort in your neck, consider placing your head onto a cushion or folded blanket.
- Once you’re in this position, you can either keep your right arm straight or bring your hand next to your head, with the elbow bent. Bending the elbow can deepen the posture and the twist through the spine.
- To come out of the posture, bring your right hand next to your head and press into it. As you do this, slide your left arm back to the center and press yourself up onto all fours.
- Repeat the same action. This time, walk your left hand forward and slide your right arm underneath the left.
3. Lunge

There are many benefits of lunges, and holding the pose can bring a lot of freedom to your hips. They’re a good way to release tension and to loosen the hips, making walking and moving easier. They can also help free up the lower back.
- From all fours, step your right foot forward between your hands. If required for your body, walk your left knee back slightly.
- Frame your foot with your hands. You can be on your fingertips or, if the floor is too far away for you to do this comfortably, try bringing your hands onto your thigh.
- Take a few deep breaths here, working on edging your hips forward and down.
- Release your hips back slightly to come out. Place your right knee next to your left and repeat. This time stepping your left foot forward.
4. Child's pose

Child’s pose is wonderful for extending your spine. You also have a hip and groin opening and stretch the lower back muscles and open the shoulders. This is an all-round excellent yoga pose for mobility.
You can always use a cushion under your hips or head to make this posture more comfortable. Remember, you shouldn’t feel any pain in your knees and shouldn’t be straining.
- From all fours, slowly bring your hips back towards your heels. You can keep the knees together or have them apart. Choose the option that feels most comfortable for your body.
- Extend your arms forward or make a pillow with your hands and rest your forehead on the back of your hands.
- Take 3-5 deep breaths here, sinking your hips back with every exhale.
5. Wide-legged forward bend

This posture is great for stretching the inner thighs and hamstrings. It also opens your hips, ankles and shoulders.
- Stand tall facing the long side of your yoga mat. Place your feet slightly wider than hip-distance apart, feet parallel to the short sides of your mat.
- Clasp your hands behind your back, or use a scarf or belt, and lift your chest as you inhale.
- On an exhale, fold forward allowing your arms to come over your head, as far as is comfortable for you. You can allow your knees to bend, if you prefer.
- Take 3-5 deep breaths here before pressing into your feet to slowly come up.
6. Triangle pose

Triangle pose is a deep side stretch, helping to open your torso with its gentle twisting action. It’s also good for opening the hips, groin, ankles, and shoulders.
- With your legs wide, turn your right toes out to the short edge of your yoga mat. Turn your left toes in so the foot is on a diagonal.
- Bring your arms wide, parallel to the floor at shoulder height. Stretch your fingers wide.
- Inhale and as you exhale, fold down over your right leg. Bringing your hand to your right leg wherever you can reach. Bring your left fingers to point towards the ceiling, palm facing out.
- Take 3-5 deep breaths here before pressing firmly into your feet and lift up. Repeat, folding over the left leg.
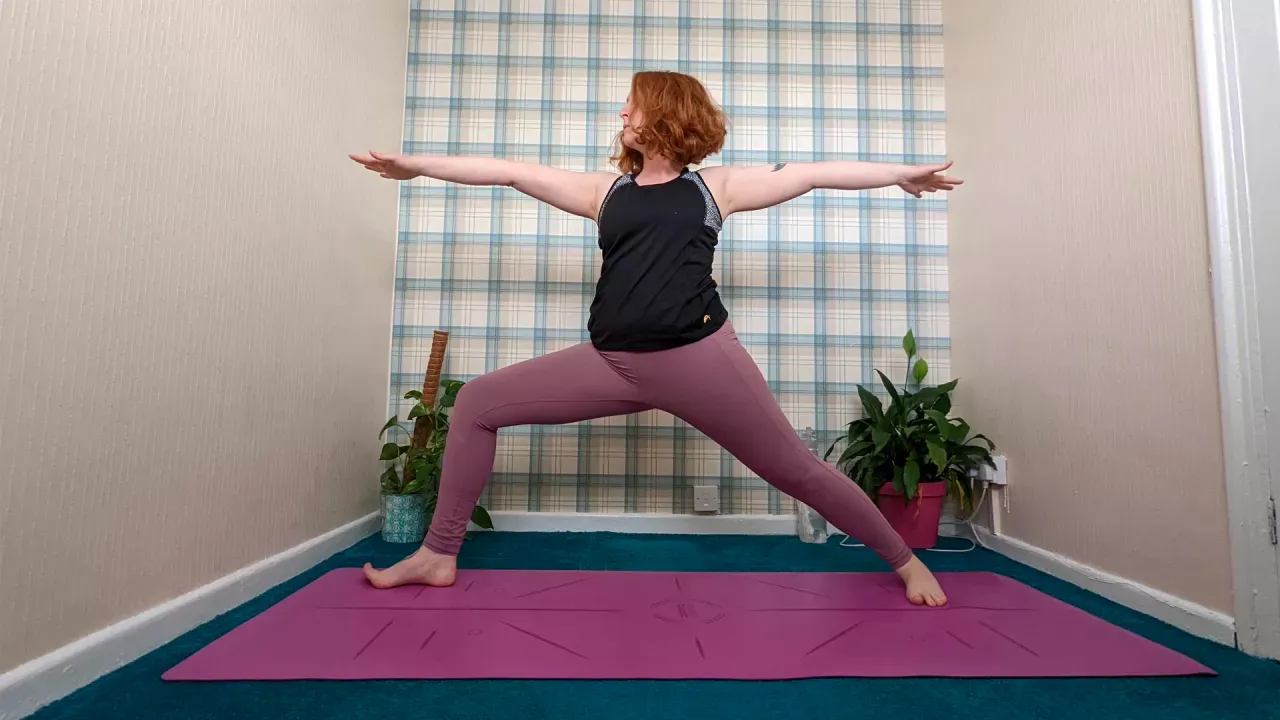
7. Warrior 2

Warriors are superb for improving the mobility of the knees, ankles, hips, and groin, helping to build strength in the leg muscles and opening the joints of the lower-body.
- Keeping your legs wide, turn your right toes out to the short edge of your yoga mat. Turn your left toes in so the foot is on a diagonal.
- Bring your arms wide, parallel to the floor at shoulder height. Stretch your fingers wide.
- Inhale and as you exhale, bend into your right knee so your knee stacks above your ankle. Press back into your left leg, planting the outer left foot down.
- Sink your hips down and take three deep breaths before returning to the starting position.
- Repeat on the other side, bending into your left knee.
8. Standing backbend

Backbends are perfect for extending the front of the body. This particular one is also beneficial for the knees and shoulders, and contributes towards keeping your spine healthy to further improve your posture and mobility.
- Bring your feet to hip-distance apart. Press firmly into your feet and engage your thigh muscles.
- Place your hands on your hips and inhale, lift your chest up. As you exhale, begin to arch back gently, dropping your tailbone and pressing the hips forward.
- Stay here for three breaths before pressing into your feet and coming back to a straight spine.
Will yoga make you more flexible?
Flexibility and yoga may seem like they go hand-in-hand, but is this really the case? We spoke to Laura Pearce, a senior breathwork & yoga teacher, and founder of Yoga Collective London, who answered our questions about flexibility.
"So much of Yoga is moving through big ranges of motion, and cycling through mobility work, dynamic and static stretches, all of which has been proven to improve flexibility," she said. "BUT like anything, your practice needs to be consistent; it takes time to see the benefits and even more time to maintain them!"

Laura Pearce is a yoga instructor and the founder of Yoga Collective London who's journey began early on in life as her congenital heart condition caused her to struggle with breathing issues (Dyspnoea). Her classes are soulful, a little wild, non-dogmatic, and riddled with breath work.
We also spoke to yoga and Pilates instructor Eloise Skinner, who explained that "a regular yoga practice will increase flexibility and range in your muscles. This usually happens as a result of consistent stretching of your muscles, although other lifestyle choices (like training in another sport or fitness style, for example) might cause tightness and restriction.

Eloise Skinner is an author, psychotherapist and fitness instructor. Eloise teaches yoga, Pilates, flexibility, and ballet across London's biggest studios.
"So, it will depend on everything you do outside the yoga class as well," she says. "It's also important to focus on other elements of functional movement as well as flexibility exercises—strengthening your core muscle, for example, or improving posture or breathing."
"When practicing yoga, we don't just relax the nervous system but allow the fascia (connective tissues) surrounding the muscles to lengthen and release," says Jade Coles, a qualified yoga teacher, and Insure4Sport yoga expert.
"Everyone's skeletal frame is different, but practicing yoga daily and consistently releasing the fascia can have a hugely positive impact on improving flexibility. It also increases overall functional strength."

Jade Coles is a yoga instructor and is passionate about the the benefits it can have on the body and mind. She completed a 200-hour Vinyasa Flow yoga teacher training in Goa with Carol Murphy, alongside a further 210 hours in a range of other yoga practices.
Is yoga or stretching better for mobility?
There are many benefits of yoga, including improved mobility and flexibility, but should you be stretching instead to get the best results? According to Pearce, you can stretch and boost your mobility using yoga alone.
"Any good yoga program can be great for improving mobility and flexibility, but most people aren't aware of the most effective way to stretch. Many rely on static, long stretches which are better for flexibility, but a dynamic yoga practice with a few static stretches may be a better long-term option," says Pearce.
"Both will deliver some benefits," says Skinner. "Traditionally, yoga is a spiritual practice that focuses on the mind-body connection, and so doesn't necessarily prioritize modern-day principles of mobility, although many sequences can help to support joint health and range.
"Stretching will also improve mobility to some extent but will have less of an impact than a focused mobility class. The best option to improve mobility would be to take a specific class or incorporate basic mobility exercises into your routine. Pilates workouts will also help to improve mobility around the central joints of the body."
Yoga teacher Michelle Taylor agrees that yoga is more than just a stretching workout. "Yoga is a holistic wellness practice that includes breathing, movement, and meditation as part of the session," she says.
"When we think about stretching, we are really talking about purely the physical stretching practice. Yoga poses could be used as a stretching practice but strips the unique essence that goes beyond a physical focus.
“While flexibility is concerned with the total range of motion, mobility is about movement. In many ways, mobility is more important in day-to-day life and functional movement that will support our quality of life," she adds.

Michelle Maslin-Taylor is an experienced yoga teacher and reiki master who helps burnt-out yogis facilitate deep transformational healing through reiki-infused yoga, weaving together yoga poses, energy healing and yoga psychology.
What's the difference between mobility and flexibility?
So, yoga can be a great way to move your body, look after your well-being, and boost your health, but where is the line between mobility and flexibility and which should you be working on for long-term benefits?
"Flexibility comes down to your ability to lengthen a muscle, i.e. can you touch your toes, or pull yourself into a forward fold? Mobility is the ability to lengthen the muscle and hold it there, so having strength and control in your end range of movement.
"You can also think of flexibility as being a more passive stretch (using the floor to stretch you or pulling your leg into a stretch), while mobility is a more active endeavor and usually takes more effort, with no pulling, pushing, or props used to get you there," says Pearce.
Skinner adds: "Mobility is often defined as the ability of a joint to move through its range of motion without encountering pain or restriction. Flexibility refers more to muscles: the ability of a muscle (or other soft tissue) to stretch and lengthen.
"You could think of flexibility as more of a temporary stretching sensation and mobility as related to the efficiency of our body. Flexibility can help us with range and lengthening, and mobility can help prevent injury, preserve joint health, and reduce joint pain."
Coles explains how different styles of yoga will have different benefits. "Yoga is great for improving mobility as your instructor will usually plan a journey to a specific peak posture. This lengthens and stretches specific muscle groups, and also works the muscles around your joints," she says.
“Dynamic classes such as Vinyasa, Power, or Mandala yoga will primarily focus on improving mobility. Classes such as Yin Yoga will focus on more passive, longer holds of poses throughout the class.
"This lengthens the connective tissues and elongates the muscle group to enhance flexibility and elasticity. These styles complement each other perfectly, and both are necessary for a healthy body and mind."
